In this post, we will discuss how to delete multiple transactions in QuickBooks. If you are wondering how to delete item list in QuickBooks then you have landed at the perfect place.
When you work with a data-oriented application, like Excel, spreadsheet, or any other, you become familiar with dealing with large entries, several transactions, and recording numbers every day. If QuickBooks transactions seem to pile up, you might have tried to delete several transactions.
Only to discover that the deleting procedure for many transactions isn’t as simple enough as you thought it would be. You have until now realized that the commands you hope to have of the “delete in bulk” option don’t operate the way you wanted it to. To overcome these limitations, here is a guide on how you can delete multiple entries of your QuickBooks transactions.
The undeletable
There are a few customers with whom you no longer deal with. They don’t buy your products; you no longer sell them, even vendors for that matter who have dropped their dealings with you. The transactions of these vendors and customers may be quite a few, affecting your QuickBooks data. You don’t wish to view them in your report list, but QuickBooks doesn’t allow you to delete a record. You might witness an error message when you delete certain entries.
Unwanted Accounts
If you have recently changed your banking system, close the account, or have stopped using it, the items that are in connection with the account, your past transaction will reflect your current QuickBooks data, and it doesn’t delete too. To remove or stop viewing the past and cluttering data; you can think of hiding them instead of deleting them. This can be done by navigating to the Charts of Account Window, and then click on the option that states “Make Account Inactive”
Also, read – How To Pin Message And Group In Telegram
Delete Multiple Transactions in QuickBooks: A Step-by-Step Guide to Cancel QuickBooks Online
Step 1:
It is important at first, to switch to the “Single-User-Mode,” do not switch to the “Multi-user-mode” option as it will not help you proceed with the process easily. You will find it easy when you navigate to QuickBooks Online.
Step 2:
Once you have switched to a single user, you have to navigate to Accountant and then click on “Batch Delete/Void Transactions”. This is what can help you delete multiple entries at the same time. Choose all the transactions that you wish to delete or get rid of permanently. You can do so by scrolling through the list of available transactions.
Step 3:
Then, make sure you click on “Review & Void” to move ahead with the transaction. There is a similar option to it which you can select as well “Review & Deleted” It does the same thing, so you can go for anyone you want.
Step 4:
Then, make sure you click on “Review & Void” to move ahead with the transaction. There is a similar option to it which you can select as well “Review & Deleted” It does the same thing, so you can go for anyone you want.
Step 5:
Now, you have 2 options, you can go for either of the two buttons. “Backup and Void” or “Backup up and Delete” If you want to delete, you can choose to delete, whereas if you wish to void the transaction, you can do so. Also further, there are other steps optional “Void Only” or “Delete only” from the drop-down menu. Choose the one that you think is favorable for your situation.
Step 6:
To view the menu, you can click on the down arrow in the next button present. Once done, you can move ahead by saving everything you have done till now and click on “Yes.”
Tips to Consider:
There are times when you wish to create or view the records of all deleted transactions that you have performed through the above steps in your QuickBooks. Luckily, the tools give you the accessibility to print them out for future references.
If you want to do it, you can choose the “View Deleted or View Void transaction” report. You can then select the print option from your keyboard or hit Ctrl/Cmd + P for printing the details. There are other ways as well which can perform the printing procedure.
Other quick Method to Delete Multiple Transactions in QuickBooks:
QuickBooks allows you to delete multiple transactions through multiple steps and not just one. Whichever seems quick and easy for you, you can perform the same.
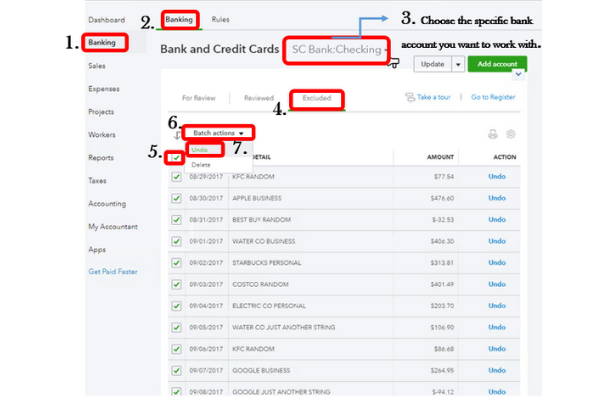
Step 1: Select the bank and choose your account. Navigate to the “For Review” option and select all transactions you wish to remove.
Step 2: Hit “Batch action” and then “Exclude selected”
Select the transactions one more time from the Excluded section.
Step 3: Choose the “Batch action” button again and then click Delete
Wrap Up How To Delete Multiple Transactions in QuickBooks
Follow these steps to delete multiple transactions in QuickBooks. This might seem tough for you in the beginning, however, it is easy if you go step by step mentioned above.
